New Site!

December 18, 2008

Well, my new blog is up, polished and the content from this one has been imported. I must say, moving the content was pretty easy. 

The new location is: http://blog.dwaingleason.com – I’ll be posting links here to new posts, but the actual content is going to be going up over there.

WordPress is pretty cool stuff. I might even learn a little PHP from all this. *shudder*


Christmas Candy Countdown – Layered Mint Chocolates

December 17, 2008

p1030782

A cookbook called Treasury of Christmas was a gift my wife and I received not long after getting married – 1995, I think – and since then it’s been one of my go-to cookbooks for holiday recipes. It’s one of those “lots of name-brand” cookbooks, but it’s very lavishly illustrated with color pictures, and the recipes are largely excellent. The book appears to be out of print, but I thought I’d share some of my favorites from it here.

This recipe tastes a lot like Andes mints, and it couldn’t possibly be simpler. Just make sure to let each layer cool for at least 10 minutes in the fridge (or less in the freezer) before pouring the next layer on to keep the layers nice and distinct. I make 2 batches of this each year, one with a red stripe and the other with green. It’s festive!

Layered Mint Chocolate Candy

  • 1 12 oz Package Semi-Sweet Chocolate Chips
  • 1 14 oz Can Sweetened Condensed Milk
  • 2 Tsp Vanilla Extract
  • 6 Oz White Confectioners Coating (either white almond bark or white chocolate chips)
  • 1 Tbs Peppermint Extract
  • Red or Green Food Coloring

Directions

  1. Melt the chocolate chips with 1 cup of the sweetened condensed milk – I like to use the microwave for this step, it takes me a minute to get the chocolate melted
  2. Stir the vanilla into the melted chocolate
  3. Spread half of the chocolate into a parchment or wax paper lined 9 inch square baking pan
  4. Chill the chocolate in the pan for at least 10 minutes (leave the other half of the chocolate at room temperature)
  5. Meanwhile, melt the white chocolate with the remaining condensed milk (again, I do this for 1 minute in the microwave)
  6. Stir the peppermint extract and a few drops of food coloring into the white chocolate (see note below)
  7. Spread the white peppermint chocolate onto the chilled chocolate mixture, then chill for an additional 10 minutes
  8. Spread the remaining melted chocolate on top of the white chocolate layer, then chill for at least 2 hours
  9. Turn out the candy onto a cutting board and cut into squares

Note: This will seem like a lot of peppermint extract, but it’s necessary to make this layer stand up to twice the amount of semi-sweet chocolate. Also, start out with 3-4 drops of the food coloring, then add more a drop at a time until you reach your consistency. Too much food coloring could cause the white chocolate to clump up, and that’s trouble.

Source: Treasury of Christmas, out of print


Christmas Candy Countdown – Chocolate Butterscotch Divinity

December 17, 2008

p1030777

This was a new recipe for me this year, and honestly I don’t remember if I’ve ever had divinity before. Sure, I’ve heard of this classic candy, but it’s just never been a part of my family’s holiday tradition. However, my wife’s Grandmother used to make this candy for her family, so when I was looking for some new things to try this year Jen asked specifically for me to try this out. The results are very tasty, and this is actually a pretty simple recipe.

I really recommend using a stand mixer to work this recipe. Doing this by hand (like my wife’s Grandmother probably did) is not something I’d like to undertake.

Chocolate Butterscotch Divinity

  • 2 Cups Sugar
  • 1/3 Cup Light Corn Syrup
  • 1/3 Cup Water
  • 2 Egg Whites
  • 1/8 Tsp Cream of Tartar
  • 1 Tsp Vanilla Extract
  • 1/2 Cup Milk or Semisweet Chocolate Chips
  • 1/2 Cup Butterscotch Chips

Instructions:

  1. Combine the sugar, corn syrup and water in a saucepan over medium heat, stirring constantly until the mixture comes to a boil.
  2. Once the syrup is boiling, brush the sides of the saucepan with a pastry brush dipped in hot water to keep sugar crystals from forming.
  3. Cook the syrup until it reaches the Hard Ball stage, 255f
  4. Meanwhile, beat the egg whites with the cream of tartar until stiff peaks form
  5. Slowly pour the hot syrup into the eggs whites, beating constantly
  6. Add the vanilla and continue to beat until the candy begins to lose its gloss and starts to form soft peaks (this can take several minutes)
  7. Stir in the chips, allowing them to partially melt into the candy
  8. Drop tablespoons of the candy onto parchment or wax paper lined cookie sheets and allow to cool thorougly

The divinity will have a dense yet airy texture, more dense than meringue. The candy will stick to itself, so layer it in an airtight container between sheets of parchment or wax paper.

Source: Treasury of Christmas, out of print


Christmas Candy Countdown – Coconut Bon-Bons

December 17, 2008

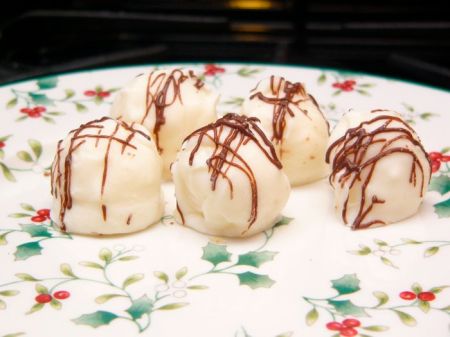
p1030778

I found this recipe on the interwebs in 2004, and they’ve become a favorite with most of my family…but they’re also a source of some controversy. See, for some reason not everyone likes coconut. I know, I know, it seems strange to me too…but that’s the truth. So for those who enjoy coconut, here’s a very easy recipe that tastes great, a lot like a Mounds bar. I’ve thought about putting a roasted almond in the center or on top of these things, but haven’t pulled the trigger on that recipe modification yet.

Coconut Bon-Bons

  • 21 Ounces Sweetened Coconut (3 small bags)
  • 1 Pound (16 oz) Powdered Sugar
  • 1 Can (14 oz) Sweetened Condensed Milk
  • 1 Tsp Vanilla Extract
  • 1 Stick (8 oz) Butter, melted (or margarine, if you hate life)
  • 1 Package Chocolate Candy Coating (i.e., Almond Bark), Chocolate or White Chocolate

Directions:

  1. Mix the coconut, powdered sugar, condensed milk, vanilla and butter thoroughly. I use my stand mixer to do this, it turns into a sticky mess.
  2. Refrigerate the coconut mixture for at least an hour – this will make it easier to scoop
  3. Scoop out tablespoons of the mixture onto sheet pans lined with parchment or wax paper, then roll with your hands into smooth balls.
  4. Refrigerate the trays of coconut balls for another hour – this will keep them from coming apart in the chocolate dip
  5. Melt the chocolate coating according to the package directions
  6. Dip each ball in the chocolate, turning to coat, then place back on the paper-lined sheet pan until set

I recommend keeping these things in the fridge because of the milk and butter in the recipe, personally. Better safe than sorry. Also, if you don’t already have a variety of sizes of scoops, they come in really handy for these type of recipes. We’ve got a few and they make candy and cookie making so much easier and the results are much more uniform.

Source: About.com


Christmas Candy Countdown – Crunchy Peanut Butter Puffs

December 17, 2008

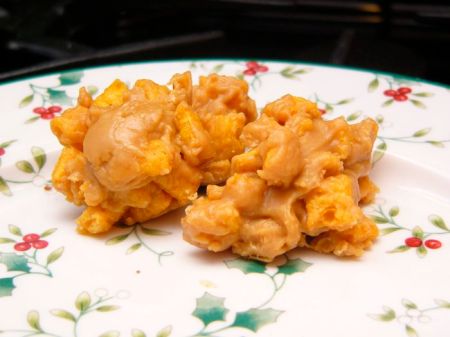
p1030775_2

This recipe really takes me back. When I was a tyke growing up in eastern Iowa, each year we would come down to Kansas City at Christmas to visit both of my sets of grandparents. My Grandma Gleason was a great cook, and she made a variety of different candies – including this, which I call Crunchy Peanut Butter Puffs. These couldn’t be simpler, but they’re really delicious. 

That’s the way my Grandma’s recipes are – simple but delicious. She passed away about 10 years ago, and making this candy for my family each year is a simple way for me to remember her. 

Grandma Gleason’s Crunchy Peanut Butter Puffs

  • 1 Cup Sugar
  • 1 Cup Light Corn Syrup
  • 2 Cups Peanut Butter (I prefer smooth, but crunchy would certainly work)
  • 4 Cups Regular Cap’n Crunch cereal (or the nearest store-brand equivalent)
  1. Combine the sugar and corn syrup in a saucepan and bring to a boil.
  2. Once the sugar/syrup mixture is boiling, remove from heat and stir in the peanut butter.
  3. Pour the peanut butter syrup mixture over the cereal and stir to coat
  4. Drop tablespoons of the coated cereal mixture onto cookie sheets lined with parchment or wax paper, then allow to cool

See? Simple! But so tasty. These have a sweet and salty, creamy and crunchy thing going on that’ll keep people asking for more.

Source: My Grandma, Jeannette Gleason


Christmas Candy Countdown – Peanut Brittle

December 17, 2008

p10307721

I have a long, passionate love affair with peanut brittle. This was the Christmas candy in the Gleason household as I was growing up. Each year my Dad would make a couple of batches, and would work very hard to get the candy as thin as possible by stretching it using buttered fingers. I’d try to help, but invariably I’d end up burned. But the results were always delicious.

As an adult I continued my Dad’s tradition, but I don’t really get too caught up in trying to keep the brittle super-thin. Sure, I spread the candy out as I put it on a sheet pan, but that’s as far as I go. I was always more concerned with just getting the candy to set up right. Each year, it was almost a certainty that one batch of peanut brittle just wouldn’t work. I’d burn it, undercook it…something would go wrong. Until 1999, when my manager at Sprint – Janice – told me a few weeks before Christmas about how she made peanut butter in the microwave. I called her a filthy liar, because that’s what she had to be…but the next day she e-mailed me the recipe, and lo and behold it had the same ingredients as mine, but the timing and steps were different. Easy. So I tried it.

Son of a biscuit. It came out perfect. And it’s kept coming out perfect every single time I’ve made it over the past 9 years. Probably fifty batches of peanut brittle have come out of my microwave, and each one of them has been consistently fantastic. It doesn’t stick to my teeth, it’s the perfect consistency and yet still has the buttery, roasted peanut flavor that makes this one of my favorite candies.

Here is Janice’s original recipe. Of course, you can find microwave peanut brittle recipes everywhere these days, but in her honor – and in penance for calling her a liar – I’m reproducing the recipe here.

Janice’s Microwave Peanut Brittle

  • 1 Cup raw Spanish peanuts
  • 1 Cup sugar
  • 1/2 Cup Light Corn Syrup
  • 1/4 Tsp Salt
  • 1 Tsp Butter
  • 1 Tsp Vanilla Extract
  • 1 Tsp Baking Powder
  1. Combine the peanuts, sugar, corn syrup and salt in a microwave-safe bowl. This will be a sugary mess, but don’t worry…it’ll all come together.
  2. Microwave the candy on high for 2 minutes, then stir
  3. Microwave the candy on high for 3 minutes, then stir
  4. Microwave the candy on high for 3 minutes, then add the butter and vanilla and stir
  5. Microwave the candy on high for 1 minute, then check the candy. If it’s amber-colored and you can smell roasted peanuts, you’re done. If not, microwave on high for up to an additional minute (I go in 30 second increments). 
  6. When the candy looks amber colored and smells like roasted peanuts, stir in the baking powder and then pour onto a buttered cookie sheet. Spread the candy using a silicone spatula, then allow to cool.
  7. Break the candy up and then try to resist eating it all.

I generally make 6 batches of this stuff and use half of it to take to work for treats, then the other half at different family gatherings on Christmas. It’s fantastic.

Note that if you have a particularly strong (or weak) microwave, the last 2 minutes of cooking – step 5 – may be longer or shorter. Once you’ve made this recipe once or twice you’ll know exactly what to look for in terms of color, consistency and especially smell.

Source: Janice, who is not a filthy liar


Christmas Candy Countdown – Fudge

December 17, 2008

p10307691

There are – in my estimation – two types of fudge; the easy type (which involves the use of marshmallows) and the not so easy type (which involves beating the fudge until it sets up). Now don’t get me wrong – for the first 21 years of my life I’d really only ever had the “easy” type of fudge, and I enjoyed it. Sure, my parents ruined it by putting nuts in it, but I still had some every Christmas. I don’t mind nuts in fudge so much now, but at the time they were really, really wrong.

And then I met my wife, and she introduced me to her Grandfather’s fudge…and it was like a revelation. Well before we were married – before we were even dating – I helped her typeset a paper that she wrote based on her Grandfather’s family recipe. To be honest, it wasn’t so much a recipe as a folk tale. The steps were imprecise, and directions vague…but the results were heavenly. If you could get the recipe to work.

I spent the next 12 years of my life chasing this fudge recipe, trying to get it right every year…and more often than not, I failed. Finally I gave up, but a couple of years ago I decided to see what the internets might offer in terms of a fudge recipe that I could work with. And of course, who should have the answer but…Alton Brown. That’s right, probably my single most revered culinary TV hero had his very own fudge recipe, and more miraculous: the ingredients – with one exception – were exactly like my recipe. 

Alton’s recipe and the one I inherited from my wife’s Grandfather differ in two important respects:

  1. The addition of a tablespoon of corn syrup, to stabilize the candy and keep it from crystalizing
  2. The inclusion of real instructions, including temperatures. 

So rather than re-print Alton’s recipe here, I’m linking to it on the Food Network website: http://www.foodnetwork.com/recipes/alton-brown/chocolate-fudge-recipe/index.html. Give it a try, and I think you’ll agree – it’s absolutely fantastic, and I have never – not once – had a batch of this fudge fail.

My recommendation for this recipe is to use top-quality ingredients, especially the chocolate. For the past few years I’ve been using the Ghirardelli 100% cacao unsweetened baking bars, and they turn out wonderfully. The best chocolate you can afford will really make this recipe something to remember.


So Close…

December 17, 2008

My new blog provider (Alentus) has my WordPress installation complete, and they’re in the process of upgrading me to the latest and greatest version. Once that’s done and I’ve found the theme I’d like to start with I’m going to start posting over there – I’ll announce the new URL (and probably cross-post my Christmas stuff) within the next few days. How exciting!


What’s Up With AT&T and Yahoo?

December 16, 2008

I received a notice a couple of weeks ago that after the first of the year my “complimentary” AT&T Yahoo! Flickr Pro account is going to be turned off, and I’m going to have to pay for service from Flickr going forward.

What?! Flickr is just about the only thing I really use from this AT&T/Yahoo! partnership. I dropped My Yahoo! and Yahoo Mail quite some time ago in favor of their Google competitors, but Flickr is actually pretty cool. I like the community aspect of it, and it’s (relatively) easy to upload pictures from my Mac. I wish there was better integration with iPhoto – there are some 3rd party things that are OK, but not as nice as the “official” Flickr uploader tool.

So I guess I like Flickr enough that I’ll pay for the service, but at this point I’m really getting squat in terms of “services” along with my AT&T DSL. So I guess that means that the next time Time-Warner or someone else comes knocking I’ll have something to think about.


Christmas Candy Countdown – Chocolate Peanut Butter Balls

December 15, 2008

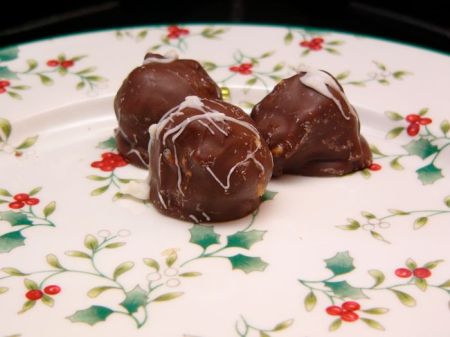
p1030779

Chocolate Peanut Butter Balls

  • 1 Cup Peanut Butter, crunchy
  • 1/4 Cup Butter (or margarine, if you’re a sadist), softened
  • 2 Cups Crisp Rice cereal (the kind that snaps, pops and even crackles)
  • 1 Cup Powdered Sugar
  • 1 Package Chocolate Candy Coating (sometimes referred to as “Almond Bark”)

I recommend using a good stand mixer for this recipe. It makes this very, very easy.

  1. Combine the peanut butter and softened butter thoroughly.
  2. Add the cereal and powdered sugar to the peanut butter mixture, mixing until well combined. This is going to be very thick when done, which is why I recommend the mixer.
  3. Refrigerate the mixture for at least 1 hour. This will make the scooping/forming step next much simpler.
  4. Scoop rounded teaspoons of the mixture onto a paper-lined cookie sheet (use either wax or parchment paper), then form the spoonfuls into balls using your hands. Be quick about this, the balls will start to get soft as they sit on the pan.
  5. Refigerate the panful of balls for an hour or so.
  6. Microwave the chocolate candy coating according to the package’s instructions. It generally takes me 90 seconds, then stirring, then 30 seconds, then stirring, then 30 seconds, then stirring to get smoothly melted coating.
  7. Remove the balls from the refrigerator. Using a pair of wire tongs or a large fork, drop each ball in the melted chocolate and stir to coat the ball. Tap the tongs or fork on the side of the coating bowl to drain some excess chocolate, then drop the coated ball on the paper-lined sheet.

Should make around 2 dozen balls. I recommend keeping these in the fridge until an hour or so before service – don’t just leave them out, since there’s butter in them. I also recommend doubling the recipe, these go fast. They’re a family favorite around here.

Note the complete lack of ball jokes in this post. 

[Updated 12/17 with a much better picture]

Source: Treasury of Christmas Recipes, out of print